•Create nested sequence content to be dragged onto a main timeline.
•This allows users the creation of sub-compositions and compound sequences.
•The performance of nested content depends on your hardware. In general: Nested sequences need more render resources than regular video content.
How To Create Nested Sequences
There are two different ways to nest sequences into one another:
1.Go to Project Explorer, drag a Sequence tile to the Playback Editor and drop it onto a track.
VERTEX creates a Clip Container for this sequence and a Nested Sequence content item in the Project Explorer (it has got an icon with layers).
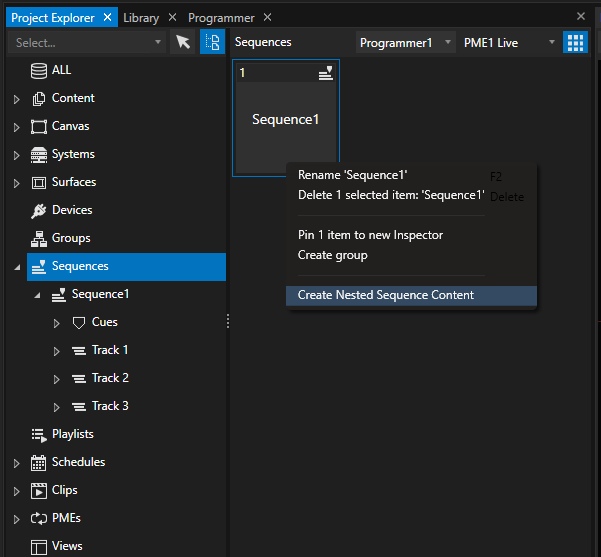
2.Use the Context menu of a Sequence in the Project Explorer to create Nested Sequence Content
Once created, a Nested Sequence Content item is listed in the content section of your Project Explorer and can be dropped into another Sequence.
 Restrictions for Nesting
Not all Devices are supported for Nested Sequence Content, so be aware of that.
A circular reference is not possible: Nested Sequence Content from a Sequence 1 cannot be used in Sequence 1.
Likewise, nesting content with multiple Canvases is not supported, so be mindful of your Canvas-Surface-Output setup.
We strongly recommend sticking to one Canvas when using Nested Sequence Content.
 Performance
VERTEX is a real time software - please keep in mind that using nested sequence content costs you more System performance.
Each nested Sequence has impact on the render pipeline. The performance needs of the render engine increases with deeper nesting, repeated or multiple nesting.
A Nested Sequence operates as an independent Playback Provider instance rather than a controllable Playback.
Therefore, it does not directly drive the playhead in a Playback Editor window.
Nested Playback
•Alternative to Nested Sequence Content with a similar effect, but differently engineered.
•Drag a playback from the Playbacks window or a PME panel in Project Explorer and drop it onto another timeline.
•This creates a Clip Container with the nested playback.
Nested Playbacks offer direct visibility into the referenced playback’s timeline and current playhead position, which can be advantageous for alignment and timing validation while programming or monitoring a show.
However, they do not inherently enforce synchronization or lifecycle control, requiring additional handling to manage activation, deactivation, and transport behavior.
Workflow recommendations
The following settings provide predictable activation, prevent stale frames, and establish a controlled execution boundary for nested playback elements within complex sequence workflows:
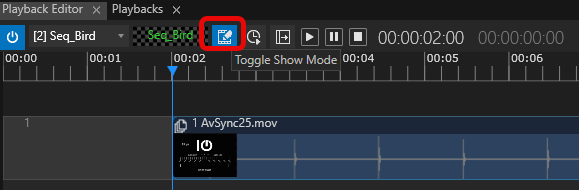
•Locking nested content: enable Show Mode in the Playback Editor of the nested content to prevent unintended playhead manipulation.
•Auto-Activation of the nested playback can be set in the Main tab of the Clip container settings. This will enable auto activation when the playhead runs into the clip. During jump-cues or timeline scrubbing, auto-activation needs to be configured via the Clip Container's Enter Script (e.g., Playback2.Activate) to guarantee correct triggering.
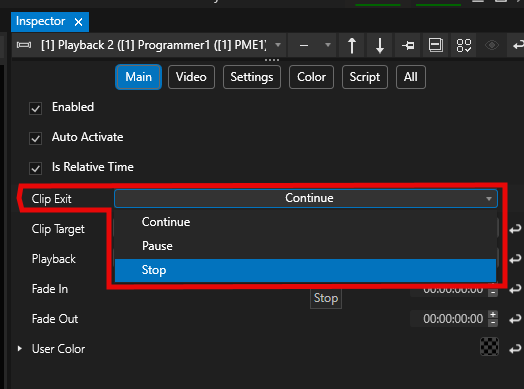
•Deactivation and transport handling are best managed using the Clip Exit property within the clip container (e.g., setting to PAUSE or STOP), ensuring the nested playback does not persist beyond its intended range:
•Is Relative Time (vs host time)
•Enable Is Relative Time to unsynchronize a nested playback from the host playback’s timecode.
When this option is disabled, the nested playback follows the host’s timeline position instead of starting at its own relative time. For example: Sequence 1 is 20 seconds long and the provider for Playback1, which is then nested into Sequence 2 with its Clip Container placed at 00:01:30:00. This will lead to the nested playhead jumping to 1:30 - which is outside its valid range - before looping back to the start.
Disable this setting only when the host and nested playbacks share the same duration.
•For a delayed teardown, implement a Leave Script with a timed offset (e.g., wait 2; Playback2.Deactivate), noting that this requires the Clip Exit behavior to remain set to Continue to avoid preempting the script execution.